Setting AWS Lightsail for FastAPI Application
In this post i will share my process of creating and setting up a lightsail instance for FastAPI Python.

In this post, I will break down my process of setting up a lightsail instance for a FastAPI Application. It is the general process I follow and things might be different for specific use cases.
1) Creating a new Lightsail Instance
I Prefer to create a new instance using the following configuration.
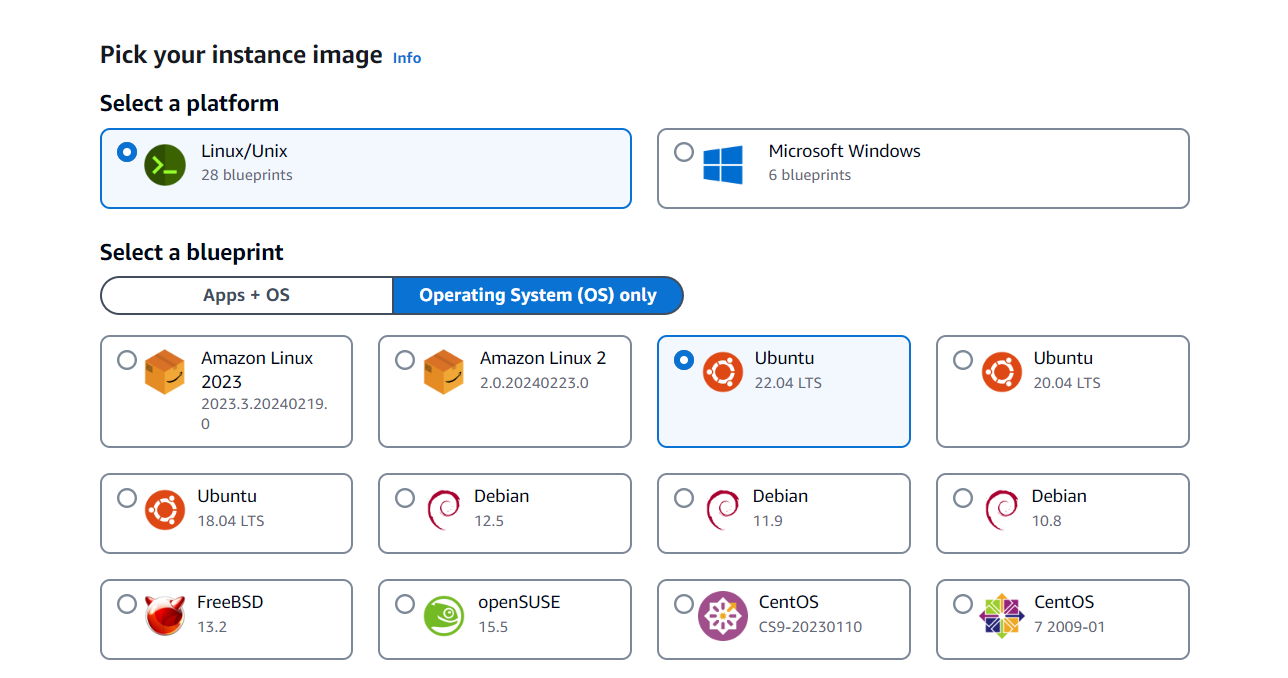
After using the following settings, Choose the desired size as per your application needs. I prefer to give a name to my instance to avoid any confusion later on. You can leave it to default i.e "Ubuntu".
2) Assigning a Static IP to the instance
This step is crucial because if you don't do this then your IP address will change every time you restart your instance. Leading to all sorts of issues 😖
Open your instance, go to networking, and click on "Attach Static IP"
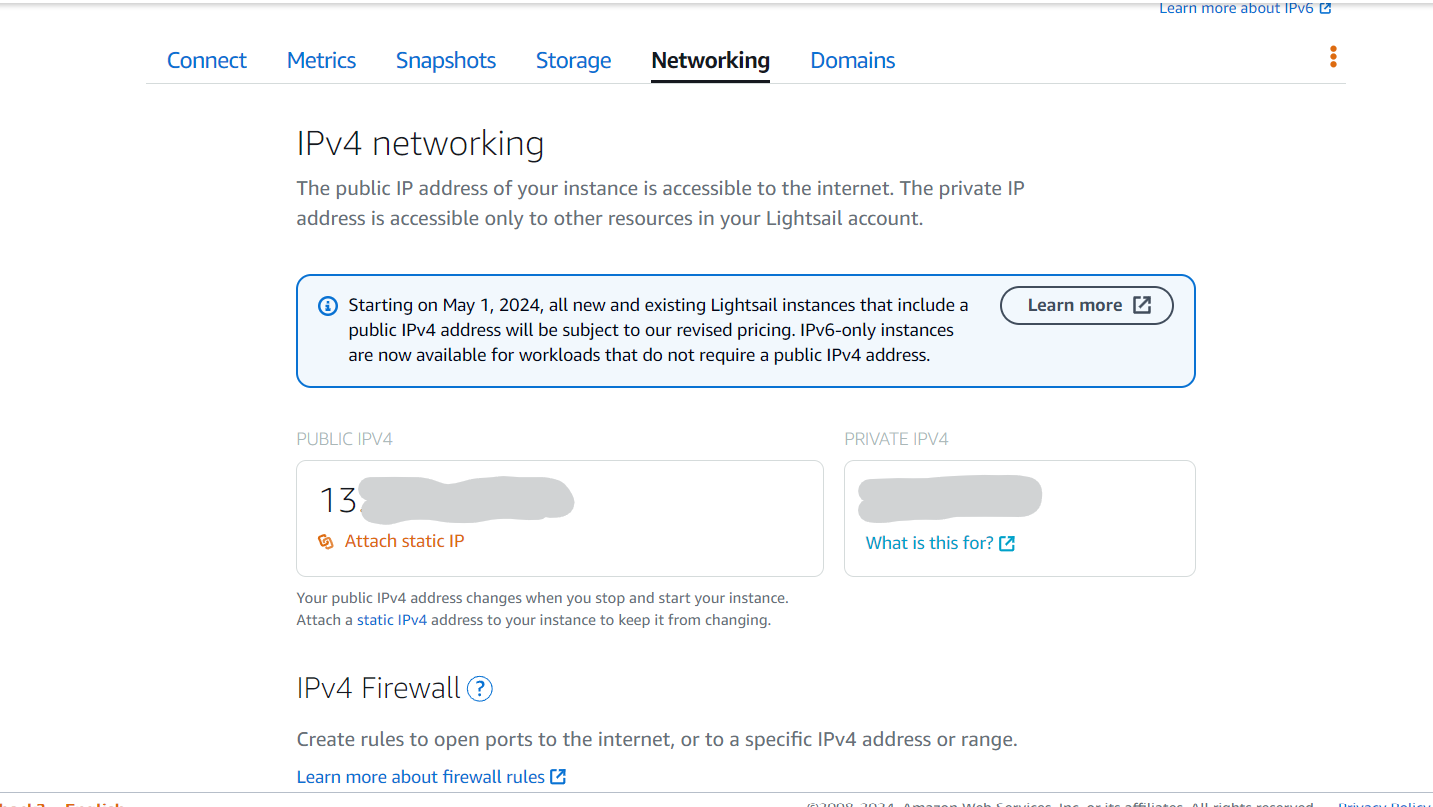
Choose a name to identify your newly created static IP and click "create and attach". Now you have an IP address for your instance that will not change.
3) Installing Dependencies
By default ubuntu comes with Python version 3.10.6, I am currently using Python 3.11 for all my projects so I created a script to update and install all the required dependencies.
Copy the contents to a .sh file and run the file, it will walk you through the steps.
echo "Running Scripts"

# Updating
sudo apt update
sudo apt upgrade -y

#Installing Nginx
sudo apt install nginx -y

#To Install python 3.11
sudo add-apt-repository ppa:deadsnakes/ppa
sudo apt-get update
apt list | grep python3.11
sudo apt-get install python3.11 -y
sudo update-alternatives --install /usr/bin/python3 python3 /usr/bin/python3.10 1
sudo update-alternatives --install /usr/bin/python3 python3 /usr/bin/python3.11 2

sudo update-alternatives --config python3

#Installing Pip
sudo apt install python3-pip -y

echo "Setting up virtual Environment"
sudo apt install python3.11-venv -y
Setup Script I use
Now you have upgraded your Python version to Python 3.11, let's install FastAPI.
pip3 install fastapi
pip3 install "uvicorn[standard]"
Note:- If you face the error when using Python "ImportError: No module named apt_pkg" follow the steps here to solve the issue.
4) Setting up Nginx
To make our uvicron server accessible from the internet, we need to setup a reverse proxy using nginx.

We have already installed Nginx in the setup part, we only have to configure it on 127.0.0.1:8000 so all the requests to/from our Public IP address or domain are routed to uvicorn server.
cd /etc/nginx/sites-enabled/
sudo nano fastapi_nginx
There will be a configuration file named "default" in the folder, delete it.
sudo rm defaultYou can replace "fastapi_nginx" with any file name you like. Now paste the following in the newly created file.
server {
listen 80;
server_name 18.116.X.X;
location / {
proxy_pass http://127.0.0.1:8000;
}
}
Replace 18.116.X.X with your public IP address or your domain name (For ex - api.example.com) and map the sub-domain to your public IP address using your DNS provider.
Run the test using the command
sudo nginx -t
sudo systemctl restart nginx5) Running FastAPI server
Let's create a "Hello world" FastAPI server to check if everything is working correctly.
Create a file named main.py and add the following code to it.
from fastapi import FastAPI

app = FastAPI()


@app.get("/")
async def root():
    return {"message": "Hello World"}
uvicorn main:app --reloadNow go to 18.116.X.X (or api.example.com if you used a sub-domain) and you will see {"Hello":"World"} in your browser.
Wrap-up
That was it for this blog.
I hope you learned something new today.
If you did, please like/share so that it reaches others as well.
Connect with me on @twitter where I write regularly about software development and solopreneurship.
✅Here are some more posts you might be interested in.
- How I improved my Python code Performance by 371%!
- RaspberryPi PICO and PYUSB: Unlocking the Power of Custom USB Endpoints in Python
Thank you for reading 😄